
")


Today we want to talk about that photographic technique so loved by both photographers and video lovers: time lapse. In reality this technique is not really a photographic technique, but not even a shooting technique, it is a mix of the two that will produce a magnificent result. In this article we will try to answer the questions about the world of time-lapse in the most thorough and appropriate way.
Which means Time Lapse
It is a shooting technique that is used to document through a set of photos the changes that occur over a long time with minimal, almost imperceptible changes, such as the movement of the stars in the sky or the rising of the sun. Specifically, it consists of taking photographs at regular shutter speeds and with the help of post-production studios in Dubai edited like a video.
Do you remember when as a child you drew on a post-it notebook and started to flip through the sheets quickly by creating an animation? Let’s say that in essence you are close to the meaning of time lapse, a set of frames that assembled together, below, form a very specific result.
So let’s summarize:
Time Lapse Is That Particular Photographic Shooting Technique That Allows You To Record Slow Phenomena Over Time In A Few Seconds
According to Wikipedia: Time-lapse photography is a cinematic technique, where each frame has a slower speed than playback. For this reason, it takes more frames to form a second of video, the amount depends on the network frame standard you are using.
Small note, we are talking about frames, not pixels or megapixels, they are completely different elements.
The frame, or photogram, is purely the single image imprinted on the cinematographic film, which mounted in sequence gives life to an animation. The pixel is a real unit of measurement used in photography. It is good to remember this.
What is Time Lapse
Ok, we read the technical definition together, but in practice we understand what we are talking about? Maybe you actually see it first than re-explain it
Did you see that ficata? It took 25 days to resume the birth of a seed until it became a real seedling, and how was it possible to resume everything in just 2 minutes and 50? Thanks to this fabulous technique.
In the video description, author Gphase described that he took a photo every 9 minutes and 36 seconds at a rate of 30 FPS. The assembly speed was 17280x. What does it mean then?
That every 9 minutes and 36 seconds the camera carefully set up by the video genius took a photo and every 30 shots a second of the video was formed. This once assembled was speeded up to 17280x in post-production. Does it still sound Arabic to you or is it starting to be clearer?
We hope what time-lapse means is now a clear thing because soon we will begin to see in practice how to make a time-lapse video.
How to do Time Lapse
Is there any particular photographic equipment? Can you try it with any camera or just modern cameras? Well, think that thanks to some applications you can even do it from your smartphone! Yes, you read that right, but let’s see later how to make time lapse with Android or with an iPhone.
Let’s talk about photographic equipment, what is needed?
- Camera
- Tripod
- Additional power supply
- Memory cards
- Time lapse supports
Let’s start analyzing the camera point by point. Here we don’t care if it’s a DSLR or a mirrorless; the important thing is that you can set the shutter speed automatically on your camera. These settings have been possible for some years on reflex cameras, even in the latest models the Time Lapse function is one of the default ones.
But to take all these photos the camera must remain stable, otherwise the result is a sequence of completely unusable blurred photos. In an old article we reviewed and ranked which are the best tripods for photographers on the market and came to the conclusion that every photographer worthy of the name in their gear must have at least one of medium quality. The average price has dropped significantly and are now within everyone’s reach.
The benefits that photographic tripods bring are so many that they are necessary for this type of photographic technique.
Additional power supply: whether they are external power banks or a power supply system connected directly to the current is not important, as long as the camera is sufficiently powered for all the time-lapse time without ever having a flat battery. Because? If you download the camera many times during your time lapse it will become impossible to resume the shooting session from that point and the work done up to that point will be completely useless.
For example, shooting in 8K with the Nikon D850 took 20 hours in this fantastic Time Lapse of Iceland.
Memory cards: with regard to this point you have the free choice, you can make sure to transfer all the photos taken on an external hard disk or even transfer them to a connected portable device. The important thing is to have enough memory because the amount of shots that will be developed will be really great and a single SD memory card will surely never be enough.
Time lapse supports: on Amazon we have found several very nice supports that allow the camera to follow very precise trajectories or movements during the shooting phase of the time lapse, simulating real camera movements.
How many photos for a time lapse
How many times have you heard this question? And how many times have you read incomprehensible or above all unrealistic answers? Well we want to answer you once and for all; there is no golden rule to apply! There is no equal number for all situations and especially for the type of final effect you want to achieve!
Each shot will have a very precise time, and as you well know, depending on its shutter speed, the final result will be very definitive, like a frozen movement with a fast time or a trail with slow times.
But in principle we can define how many shots it takes to cover portions of video, for example the classic frame rate for movies that are broadcast on television is 25fps, or every 25 frames a second of video is formed. Consequently, for a 10-second video you will need no less than 250 photos, for 100 seconds 2500 photos and so on.
Let’s recap before giving us a headache.
For a video shot, every second corresponds to 25 frames.
That said, it’s also easy to calculate how long it will take to make the desired sequence. Assuming we take 1 frame every 4 seconds, it will take 250 x 4 = 1000 seconds = 16.6 minutes to process our 10 seconds of time lapse video.
Ok, maybe not so simple and immediate, we will solve your life immediately. Online there are dozens and dozens of calculators and various tools to make these calculations in just a few seconds. How do they work? Just enter the parameters available to us to get the final values.
Here are some calculators found on the net
Photopills, very simple to use even if in English. You can decide whether to calculate the shooting interval, clip length or event duration. Depending on what you choose the variables to be entered change so that you can easily reach the final result. A very nice peculiarity is the size of the total files which is very close to reality. Photo Pills is a popular free online tool for calculating time lapse
Omnicalculator is another completely free online tool that, through simple variables, is able to define shutter speeds, total recording time, number of shots and the memory used. Very nice the ability to set the frames per second to be accurate for any video standard The Omnicalculator online tool for calculating time lapse shooting times
But if we don’t have a PC nearby and we want to do these calculations on the fly, can we do it with our smartphone too? Absolutely yes. There are applications for both Android and iPhone that allow you to make these calculations immediately.
Time Lapse application for Android
We begin to see which ones are for the Android operating system, in reality there are tens of thousands of them, but by trying them we came to choose only 4.
- TimeLapse Camera
- FrameLapse
- Lapse It
- Frame Lapse Pro
All these applications can be downloaded for free from the Play Store and in practice set the shots on the smartphone every few seconds / minutes depending on the desired effect. Our advice is always to keep the phone in a stable position with a smartphone stand and keep an eye on the desired scene lighting.
Time Lapse application for iPhone
Do you think there could be no applications to do time lapse on iPhone? Absolutely! On iTunes we have found so many that once again we have decided to select only the 4 best to give you a more accurate choice:
- Time Lapse LLC
- Sky Flow
- Time Lapse Free
- Lapse It Pro
These applications are also downloadable for free from iTunes, they are easy to understand and allow you to create beautiful time-lapses simply by setting shutter speeds.
How to do Time Lapse with GoPro
That’s right, you read that right, and you can make time lapse videos even with the magical GoPro! Indeed, we specify, it is not said that all the action cameras you find on the market allow this function; indeed, many of the cheap action cameras do not.
Some models, especially the most recent, allow you to change the settings directly from the menu, as in the photo above, but if you do not have the possibility to enter the menu you have to change via the Power button.
Let’s see now how to set the GoPro in the latter case:
- Press the Power button until the camera symbol starts blinking (takes single shots until blinking)
- By default the GoPro has the shutter speed set every 2 seconds , so if you start shooting this will be the shutter speed
- If you want to change it, you must enter the menu by pressing the Power button until you see the SET icon
- Scroll through the menu until you see the abbreviation P2 , here you can choose the seconds by setting or: P2 / P5 / P10 / P30 / P60 where the number after the P corresponds to the seconds
- Once you have chosen the desired time, just click on Power, the desired time will be set and you are ready to shoot.
A tip: if you have more GoPro, try to use them at the same time to create a video composition, as they did for the time lapse of the Space X Falcon 9, really a very very nice idea.
Second tip: To keep the GoPro stable you absolutely must buy tripods or supports that hold it steady, otherwise the final work may be useless.
How to edit Time Lapse
How to edit a Time Lapse video with Quick Time
Ok everything nice, we were able to take hundreds of photos in sequence but now how do we create a real time lapse video? Do we need special video editing programs? Well, think that you can even use QuickTime to edit the video in seconds so once you have shot the most is done!
QuickTime by now we all have it installed on our computer, if we do not have it we can download it for free.
Ok, now let’s see how to create a quick preview with QuickTime:
- You have to keep all the sequence of images in a single folder and the order must be sequential
- Click File> Open Image Sequence
- Select the first image and click Open
- At this point we will be asked the frame rate to set, a value between 10 and 30
- Once mounted, just do File> Save As and here is your video edited in a few seconds.
Time Lapse and Hyperlapse difference
Among the questions that came to us, we found that there is still a lot of confusion between the two techniques Hyperlapse and Timelapse. The style and technique are the same, but there is a small variable that makes the two different, the shot.
When in the first the composition is static, once you have found the right point with the various composition rules (such as the rule of thirds) the subject remains in that portion of the screen. Conversely, in hyperlapse there is a kind of camera movement in following the subject.
This can then be divided into two types: fixed point or constant framing.
Fixed Point Hyperlapse: The camera pans around the subject while always keeping the subject in the same spot in the frame
Hyperlapse with constant framing: the camera is always oriented in the same direction but moves on lines
Latest tips
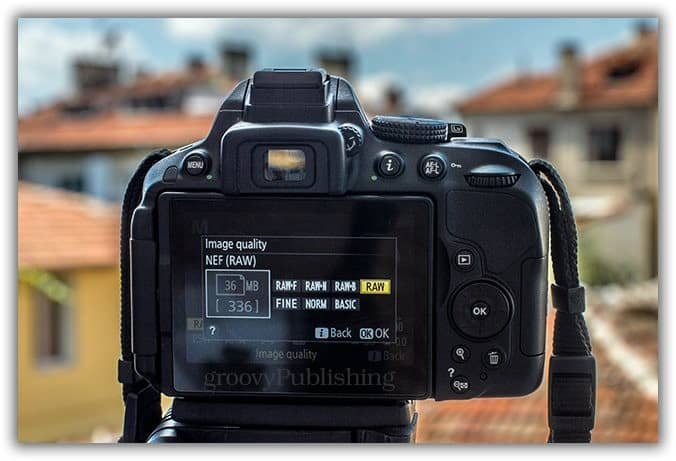
Ok, now we should be clear about what we are talking about, the techniques we have to use and above all how to edit the video later, but there is one last point that we haven’t touched yet, the format of the images to be saved.
There are several schools of thought here and as always we argue that the truth lies somewhere in between.
There are those who argue that saving a quantity of similar photos in RAW is simply a waste of memory and the final file would become sensational in size and there are those who argue that not making it in RAW would not allow the right changes in post-production to give it that extra dramatic touch.
What do we recommend? It depends on the use you want to make of it and your skills. If you are trying this technique for the first time, shooting in RAW or Jpeg + RAW in our opinion is useless, it would only imply a greater memory requirement for testing. So until you have mastered the technique, shoot only in JPEG.
Once you have become aware of your means you can start shooting in Jpeg + Raw so that you can choose the raw file if you want to edit it accurately in post-production or the simple Jpeg if you want to see the result.


